Converting PNG to vector
It is essential for designers, printers and embroidery professionals to know how to convert PNG to vector using Illustrator. The PNG format is a raster image made up of pixels. This means that they will lose quality if you resize them. Vector graphics, on the other hand, are resolution-independent and can be scaled infinitely without distortion. Understanding how to convert PNG to vector correctly is important for logos and print designs. Signage, embroidery, and signage workflows are also affected. Adobe Illustrator has powerful tools to make this conversion accessible and professional.
What is the difference between PNG and vector graphics
It is important that you understand the differences between these formats before you convert PNG to vector. Pixel-based images store color data for every tiny square of the image. These pixels are visible when the image is enlarged and can reduce clarity. Vector graphics are created using mathematical paths, not pixels. This allows for smooth curves and sharp corners at any size. This fundamental difference is why designers use vectors in branding, printing and machine-based processes.
Why designers need to convert PNG to vector
There are many reasons why you should convert PNG files to vector using Illustrator. Vector files can be edited, recoloured, and resized without losing quality. Many professional applications, such as screen-printing, vinyl cutting and embroidery digitizing, require vector files. Converting a logo that is only available in PNG format into a vector allows it to be used across many platforms and materials, while maintaining clarity and consistency.
Prepare Your PNG Image to Convert
Preparation is key before you convert PNG to vector. Choose the highest resolution PNG image you can find, since cleaner images will produce better results in vector. Images with clear edges, solid colors and high contrast convert better than photos that are blurry or complicated. The final vector quality can be improved by removing backgrounds, adjusting brightness and contrast before importing the image into Illustrator.
Importing PNG files into Adobe Illustrator
Open Adobe Illustrator and create an empty document. Drag the PNG image to the workspace or select File, then Place. After placing the image, make sure it is selected to allow Illustrator's trace tools to be used. This step is crucial for a smooth, accurate conversion.
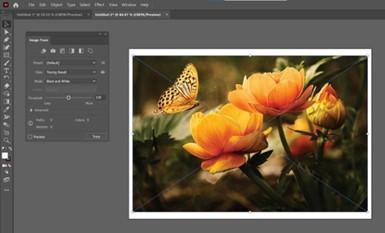
Converting PNG to vector using Image Trace
Image Trace, the main feature of Illustrator used to convert PNG to vector. Navigate to the Image Trace Panel after selecting the PNG. Illustrator has several presets, including Black and White Logo and High-Fidelity Photos. The preset you choose depends on the design. Logos and icons work best when they have fewer colors. Illustrations may need more detailed tracing. Image Trace converts pixels into editable vector paths by analyzing them.
Optimizing image trace settings for best results
Image Trace settings must be fine-tuned to produce professional results. You can adjust the number of colours, the accuracy of paths, the sharpness of corners, and noise reduction. While increasing paths can improve detail, it may also create an unnecessary amount of complexity. Reducing noise will simplify the design. When you Convert from PNG to vector, you can strike the perfect balance between accuracy and ease of use by previewing the changes in real-time.
Expanding Traced Images into Editable Paths
The image will remain a traced object after tracing until expanded. The trace is converted to vector paths by clicking the Expand button. After expanding each shape, it can be edited using Illustrator's direct selection and selection tools. This step converts the PNG to a vector image that can be recoloured or resized.
Refine and Clean the Vector Artwork
Even after you convert PNG to vector, manual cleanup may still be required. Pathfinder's tools can be used to remove unwanted shapes, smooth out rough edges and combine paths. Simplifying paths can reduce file size, and make it easier to print or produce. The final vector must meet professional standards.
Editing and Recolouring Your Vector Design
Easy editing is one of the greatest advantages of vector graphics. You can easily change colors, adjust the shapes and modify the text elements, if any, after conversion. Global colors and layers help maintain consistency and organization. This flexibility is particularly valuable for branding projects, where logo variations are frequently needed.
Save the vector file in the right format
Save the finalized design in vector formats like AI, EPS or SVG. These formats maintain scalability, editability, and flexibility. The format you choose depends on whether the vector is going to be used for digital display or printing. Saving your work correctly ensures that it can be used across multiple platforms and applications.
Common mistakes when converting PNG to vector
It is common to use low-resolution PNGs, which can result in inaccurate or jagged vectors. Over-tracing can also be problematic, as it creates too many anchor points. It can also be detrimental to quality to rely solely on automatic tracing, without any manual refinement. By avoiding these errors, you can ensure that the final vector is clean and professional.
Why manual redrawing is better than image trace
Automatic tracing may not be the best option in all cases. For best results, you may need to manually redraw gradients, photographs, or highly detailed images with the Pen tool. This method takes longer, but it results in cleaner vectors with greater control. Designers who are more advanced should know when to switch to manual methods from tracing.
Converting PNG into Vector to Support Professional Workflows
Converting PNG to Vector supports many professional workflows. Vectors are easily integrated into design and branding processes, print production, and other machine-based processes. They provide consistent quality on all platforms and products, reducing errors. This capability is particularly important for businesses who rely on precision, repeatability and consistency.
Conclusion
Having mastered the process of Converting PNG to vector in Illustrator, designers can now have greater control, flexibility and quality with their work. Each step, from preparing the image to using Image Trace and refining the paths to saving the final files, contributes to the professional outcome. Vector conversion is an essential skill for anyone creating logos, producing artwork, or improving brand assets. 1dollardigitizing is a reliable solution for professionals in the embroidery and design industry who require expert guidance and results.